How to Serve Your dochost Pages From Your Own Domain
Connect a subdomain you own, like docs.yourcompany.com, to your dochost account in three steps — one form, one CNAME record, one email. With screenshots, including the single Cloudflare setting that trips most people up.
Every page you publish on dochost lives at dochost.co/d/{slug}. On the Max plan you can put those same pages behind a domain you control instead — docs.yourcompany.com/{slug} — so a link you send a client or a class carries your name, not ours. This guide walks through the setup once, with screenshots. The whole thing takes about ten minutes, and most of that is waiting for DNS.
What you need
- A Max subscription. Custom domains are a Max feature; see pricing.
- A domain you own, and access to wherever its DNS is managed (Cloudflare, Namecheap, GoDaddy, Route 53, and so on).
- A subdomain to use.
docs.yourcompany.com,share.yourcompany.com,pages.yourcompany.com— any prefix you like. Bare top-level domains (yourcompany.comwith no prefix) cannot be connected; if you type one, dochost proposesdocs.yourcompany.comand lets you change the prefix.
You can connect up to two domains per account.
Step 1 — Add your domain in dochost
Open Settings → Domains and click Add a domain. Type the subdomain and click Add domain.
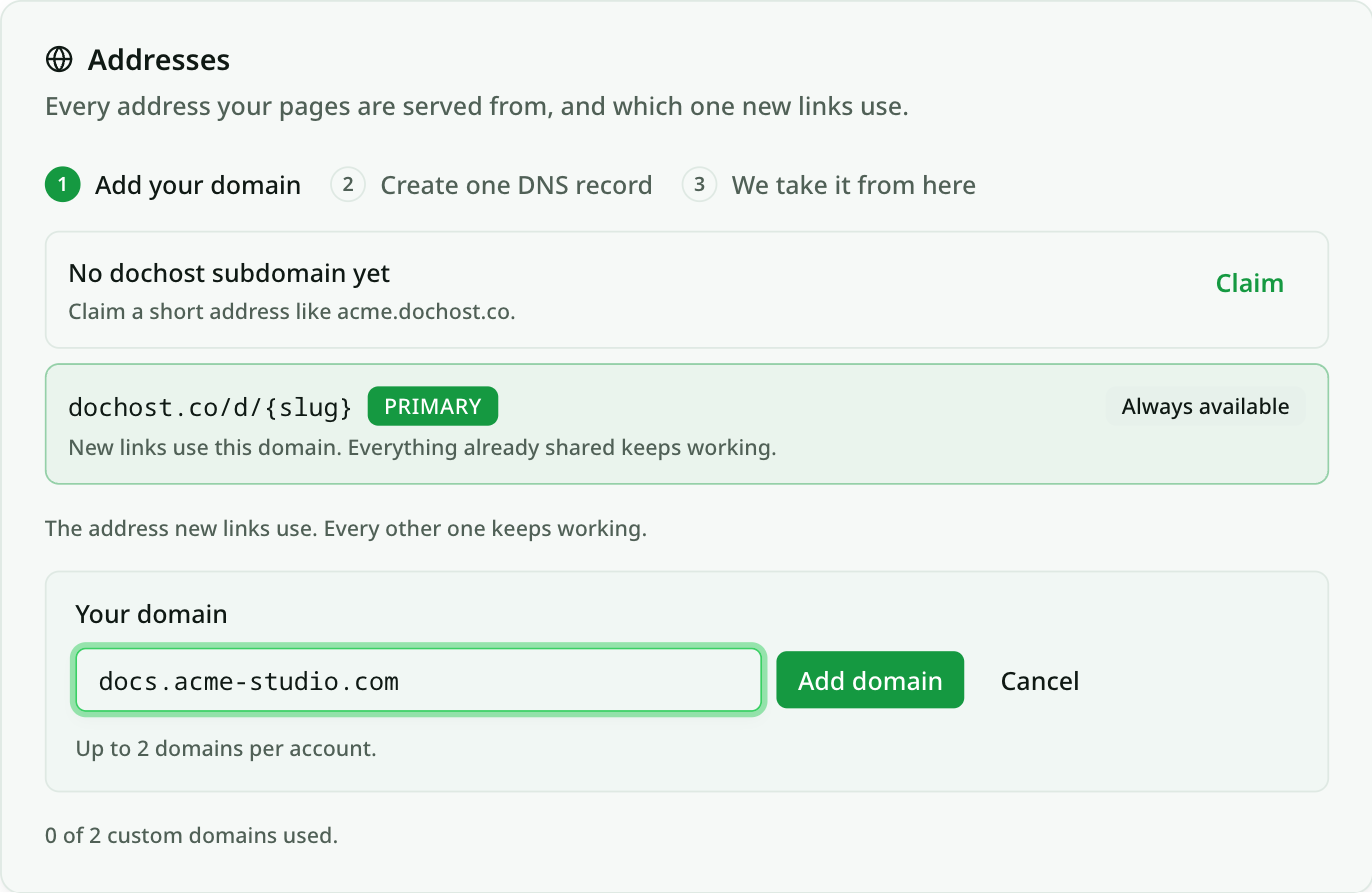
The step bar at the top of the card tracks where you are: Add your domain → Create one DNS record → We take it from here. You only do the first two.
Step 2 — Create one CNAME record at your DNS provider
As soon as the domain is added, dochost shows the exact record to create. Pick your DNS provider from the chips and the field labels switch to that provider's wording; the Open … DNS settings button deep-links to the right screen where the provider supports it.
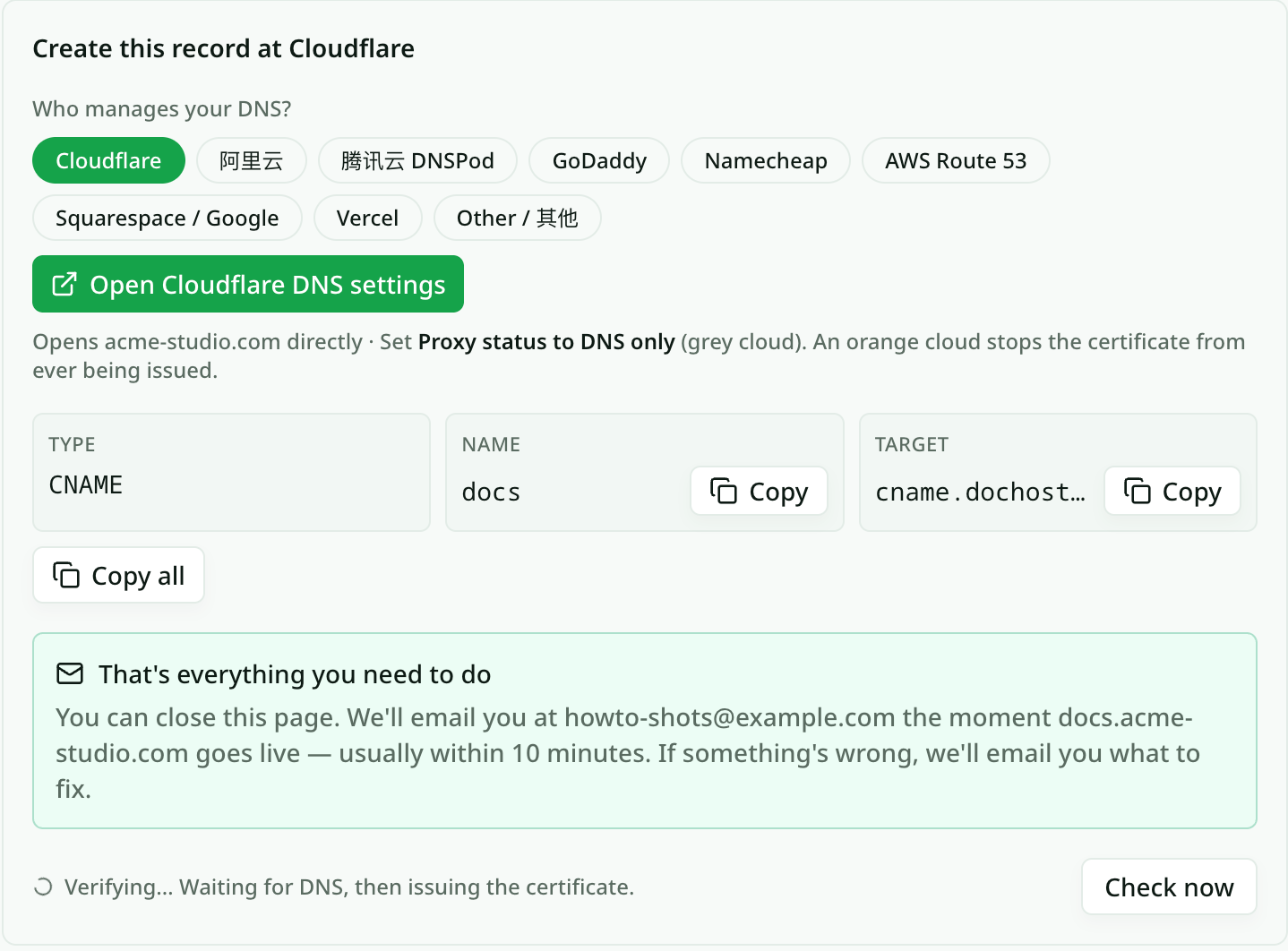
The record is always the same shape:
| Field | Value |
|---|---|
| Type | CNAME |
| Name | your prefix, e.g. docs |
| Target | cname.dochost.co |
Use the Copy buttons rather than retyping — a stray space in the target is the most common typo.
On Cloudflare
Cloudflare is the provider most readers use, so here is that path in full. Open your domain, go to DNS → Records, and click Add record.
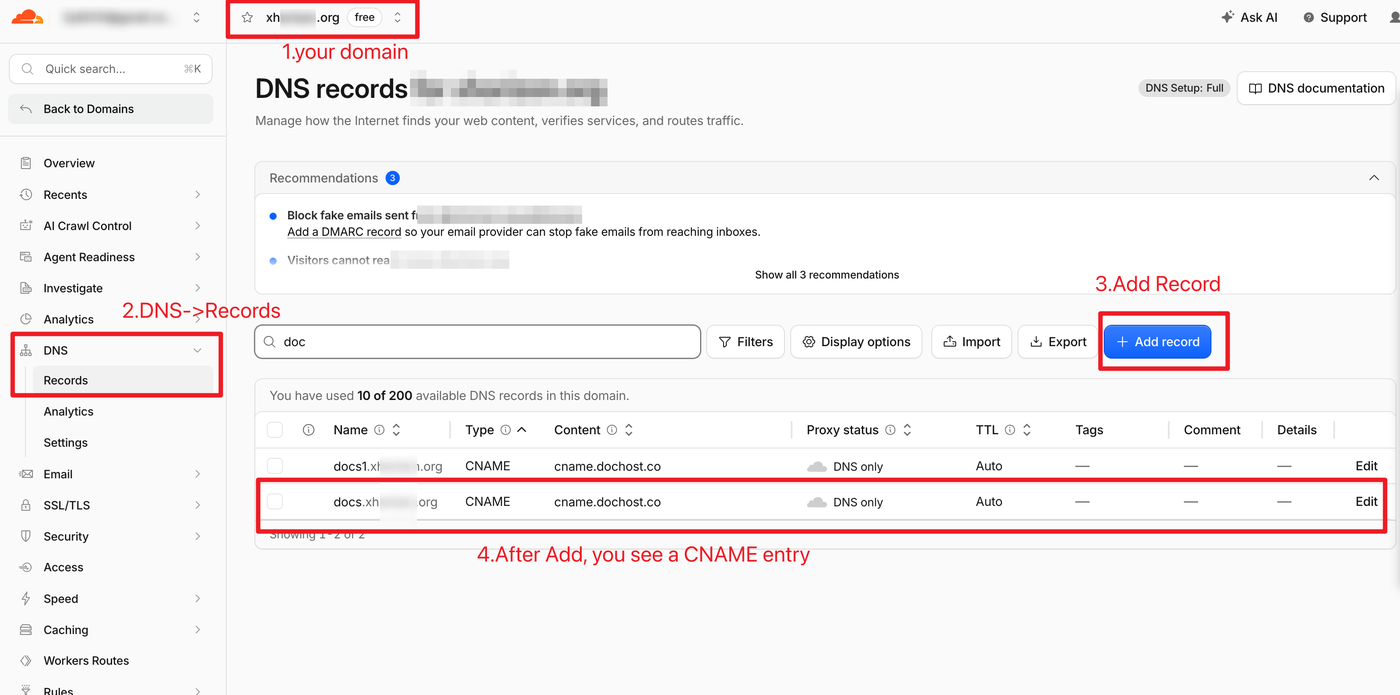
In the dialog set Type to CNAME, Name to your prefix, and Target to cname.dochost.co. Then turn Proxy status off so it reads DNS only with a grey cloud, and click Save.
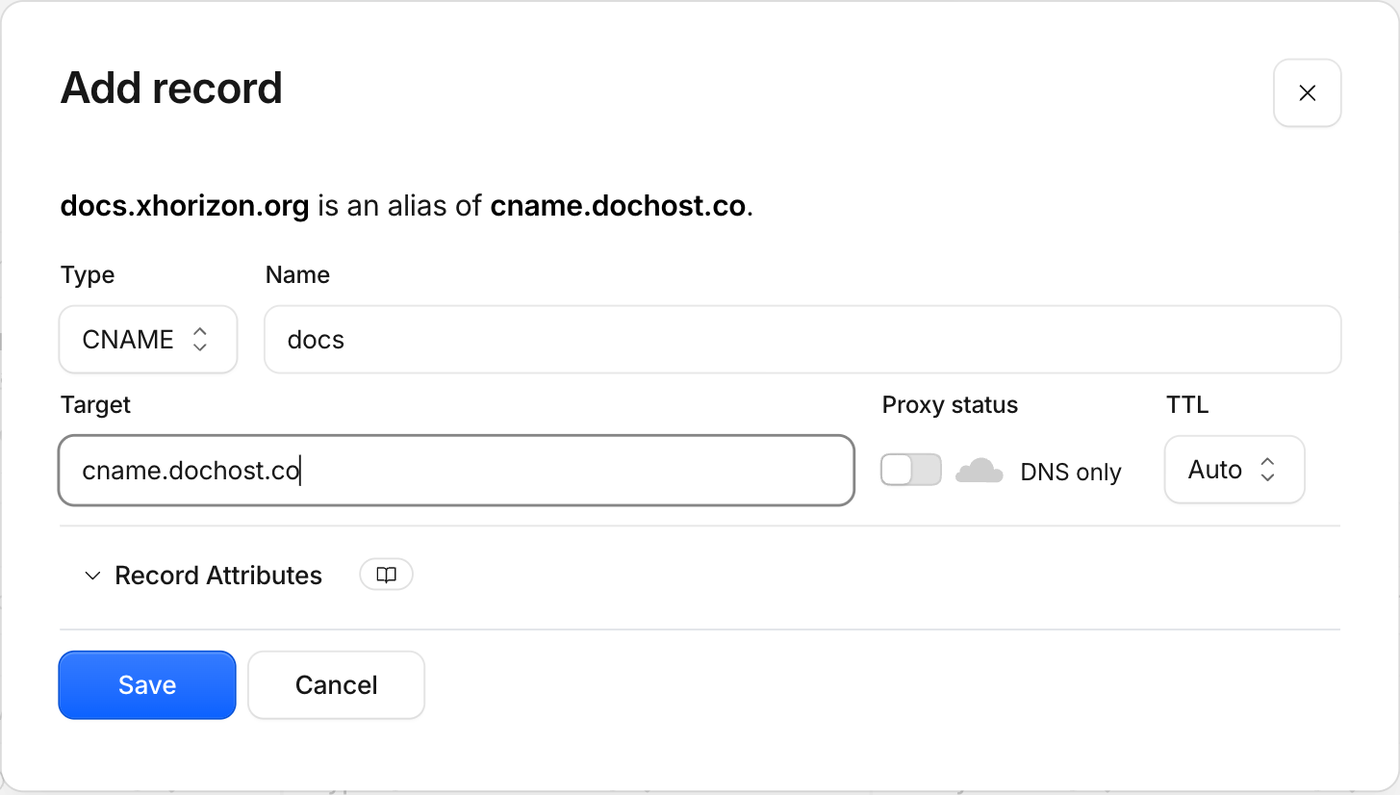
The grey cloud matters. Cloudflare turns the orange proxy cloud on by default. While the record is proxied, the certificate for your domain can never be issued, and the domain stays stuck at Verifying with no other symptom. If you only remember one thing from this page, make it DNS only.
Other providers have no proxy toggle, so there is nothing to switch off; just create the CNAME.
Step 3 — We take it from here
Back in dochost the row now shows Verifying. You can close the tab: dochost polls DNS, issues an HTTPS certificate once the record resolves, and emails you the moment the domain goes live — usually within ten minutes. If you would rather watch, Check now runs a check on the spot.
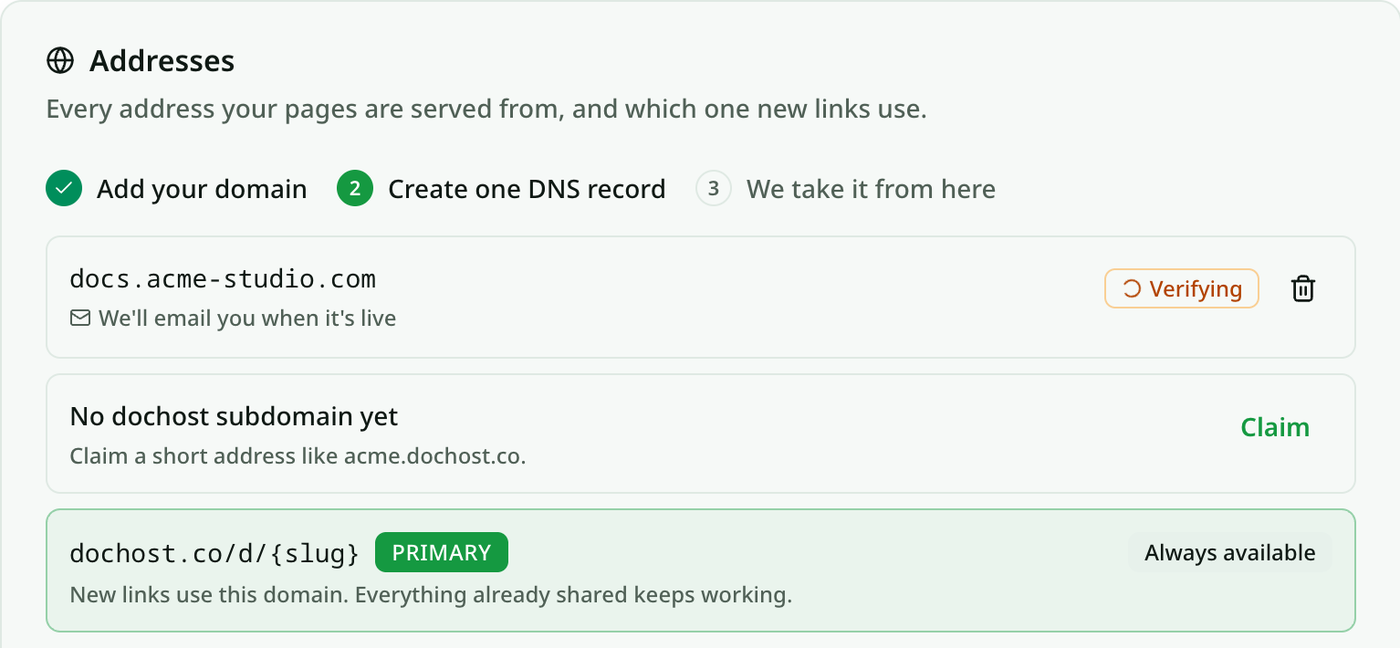
If anything is wrong, the row turns to Needs attention with a one-line reason, and the email says what to fix:
| What you see | What it means | What to do |
|---|---|---|
| No CNAME record found | The record has not propagated yet, or was created on a different name | Wait a few minutes, check the Name field, then Check now |
| CNAME points somewhere else | The target is not cname.dochost.co | Edit the record's target |
| Record is proxied | Cloudflare's orange cloud is on | Switch the record to DNS only |
| Already connected elsewhere | Another dochost account holds this hostname | Remove it there, or reply to the email |
| Verification timed out | Seven days passed with no record | Create the record, then Retry |
When it is live
Your first custom domain becomes the primary address automatically: every page you publish from now on gets a docs.yourcompany.com/… link, in the dashboard, the success panel, the browser extension and the MCP tools alike.
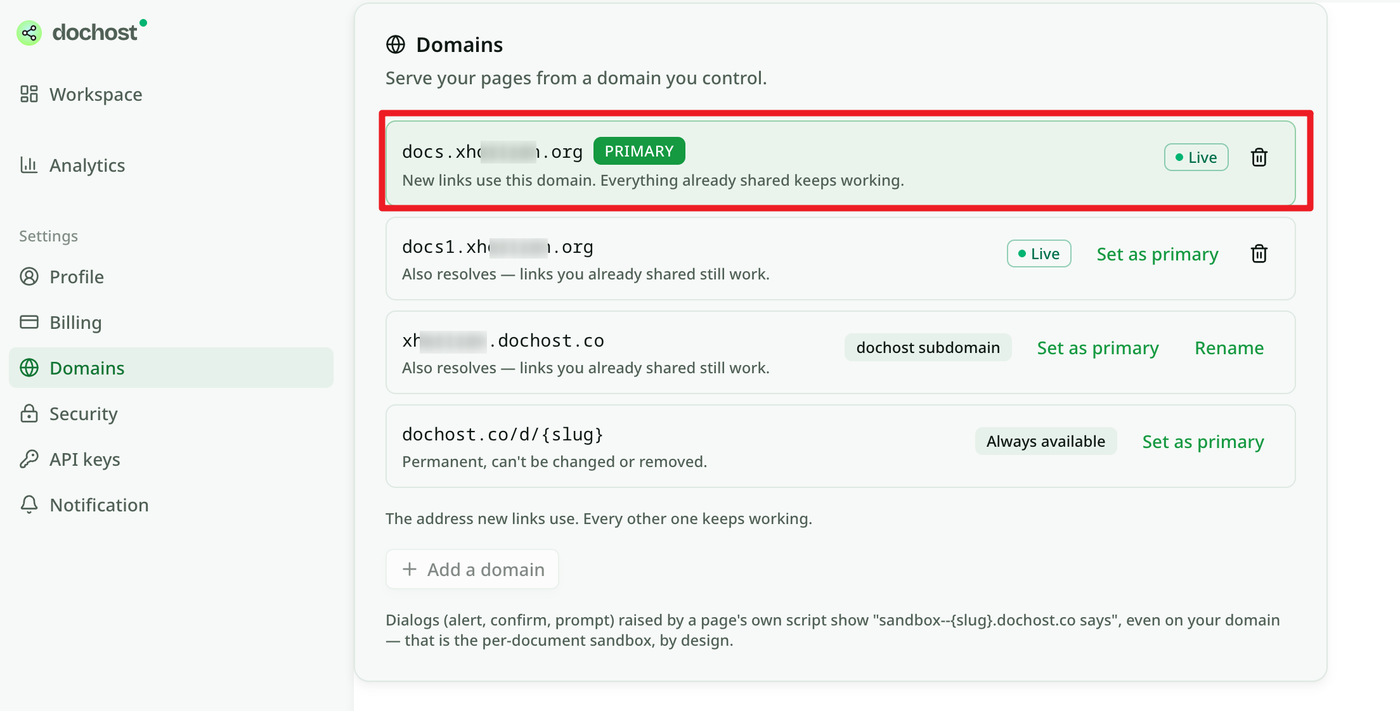
A few things worth knowing about that screen:
- Every address keeps working. Links you already shared on
dochost.co/d/…still resolve, and so does a second domain or ayourname.dochost.cosubdomain. Primary only decides which one new links use. Change it with Set as primary at any time. - Pages themselves do not change. Your documents are still stored once; the domain is just another door to the same page. Passwords, expiry and analytics carry over.
- Removing a domain stops links on that hostname, but the pages stay published and reachable at every other address.
- If you leave Max, your custom domains stop serving and links fall back to
dochost.co/d. The setup is kept for 90 days, so re-subscribing brings the domain back without redoing DNS. - Dialogs say
sandbox--{slug}.dochost.co. When a page's own script callsalert()orconfirm(), the browser names the per-document sandbox origin, even on your domain. That is by design: each published page runs in its own isolated origin, which is what keeps one page from reading another's data.
Try it
Upgrade to Max, open Settings → Domains, and add the subdomain you want. If the record is right, you will have the email before you finish your coffee.
更多文章
How to Turn a Claude Artifact Into a PDF
Claude has no export-to-PDF button, and printing from the chat prints the conversation instead. Here's the route that actually produces a clean PDF of the artifact itself.

How to Share the HTML ChatGPT Writes (Without Saving a File)
ChatGPT writes you a full HTML page, but it's stuck in the chat as code. Here's how to turn it into a link your team or client can open.
Pastebin vs dochost: Raw Text vs a Rendered Page
When Pastebin's monospace raw text is the right call, and when you actually want your Markdown or HTML rendered as a real page at a shareable link.
邮件列表
加入我们的社区
订阅邮件列表,及时获取最新消息和更新